Thursday, February 27, 2014

Play Time

I've been working hard to stay focused on my UFO projects from last year, but when this Accuquilt die came in the mail, I had to take some time out to try it out. 

Bea at Beaquilter showed some fun options using the new Hunter's Star and hexagon dies and had a drawing--I was so lucky to win. I discovered Bea's blog last year when I was working at learning my Electric Quilt software. She has tons of tutorials on EQ, as well as other useful quilting information. Be sure to check her out HERE, she is so creative (and smart!).


This is my light fabric on the die after discarding the waste.
There is a pattern included with the die, so I decided to go with that for my first attempt at a Hunter's Star quilt. The pattern calls for 4.5 yards each of light and dark fabric. I had this piece of white on white print that I had purchased as a remnant. It's a wide backing fabric, so I wasn't sure if I had 4.5 yards, but I did some calculations and figured it would work out. It did. Whew!


This is the waste from one of my dark fabrics.
 I am using scrappy blues as my dark.
You need to pre-cut 120 4" x 10.5" rectangles of the dark and light fabrics to lay on the die. Each die cut equals a light or dark half of one unit. You can cut up to six layers at a time, but I did four layers since I would need four units for each block. I felt it made it easier to keep track of how many I still needed to cut.

I was able to cut everything for the quilt in a few hours--including pressing time.
Usually those shapes would have to be cut using templates--the die makes quick work of the cutting.

All of the dog ears are already trimmed off, so the piecing is super easy.

See how nicely they fit together?

Once I figured out the pressing, putting the rest of the block together was a piece of cake!

Four of these units make a block.
I wanted all four units of my blocks to match even though the whole blocks in the quilt will be scrappy, so I had to cut the blue fabrics in multiples of four.
I plan to make another Hunter's Star that will be totally scrappy and multicolored.

First block complete--yay! Twenty nine to go!
There are all kinds of bias edges going on, so I have to remind myself to go easy on my aggressive pressing tendencies.


These are my first six scrappy blocks--I'm loving how graphic it's going to be!
Linking up to Bea here.

Tuesday, February 25, 2014

Simply Red February Update

Last week was our February Stitch Therapy meeting. 
Bad weather seems to be the theme on the third Monday of each month, so attendance wasn't great, but we did have some nice show and tell!
We have Simply Red in Orange!

The gray scribble will be used for the piecing.

Simply Red in Black

Close up of the Black
Simply Red in Blue
Multi-color Simply Red--there will be greens and mustard's too!
Brenda brought a baby quilt she made from last years buck blocks--sweet!
These are the next two blocks you should be working on to stay on schedule:
Block from page 4

Block from page 5
It's also time to get started on the 388 half square triangles!
I suggest using the Magic 8 method (tutorial HERE) or triangle paper to make quick work of them. The triangles finish at 1.5", so square them to 2" if needed.
 Also, make yourself some block design boards (great tutorial HERE) and set up your blocks. The blocks can be a bit confusing, so setting them up on a design board will save you some headaches! I made my boards when Lori first posted her tutorial, and they are one of "tools" I now can't do without! They only cost pennies to make--pick up foam core at the dollar store and use leftover batting scraps. You don't have to put the "binding" on them, but it's so cute, why wouldn't you??
As you piece your blocks, I suggest you press your seams open.
Have fun! Hopefully we will have some nice weather by the time we meet in March!

Monday, February 24, 2014

Dixie Diary: The Final Chapter!


You may remember the last time I showed my Dixie Diary blocks HERE. The blocks were sewn and the perfect sashing had been chosen--unfortunately I didn't have quite enough. Luckily, I found exactly what I needed at one of my favorite on-line shopping enablers: The Old Country Store. I had my sashing fabric in my cart (along with a few other items!) and decided to sleep on it in case I thought of something else I was in need of before I pushed that checkout button.
The elusive sashing from the Leesburg line.
 If you ever shopped at the Old Country Store, I'm sure you already know the rest of the story.

 I couldn't get my order to go through. My cart was disabled--ack! I closed my browser and went back--still disabled. I restarted my computer--no luck. Later in the day I read online that the Old Country Store was bankrupt and out of business.

 What??? I still had a $10 voucher to spend!
More importantly, I still needed that sashing fabric and now I was getting worried that I wouldn't be able to find it. I did more searching and it took a leap of faith, but I found an online retailer that appeared to have what I needed at a great price plus free shipping and an additional 10% discount. Whew!

Did it occur to me to think about the borders? Of course not! 
I figured I would find a nice brown in my stash that would work. Didn't happen. I hated everything I tried.
 Then I remembered this awesome border fabric that I had been hoarding. 
Isn't it yummy? I know--wrong color!!
But I knew it came in a green colorway--back to doing some on-line searching!

Whoo-hoo!
I found some on eBay.
 Too bad the seller didn't have enough of what I needed listed for sale.
 But it wouldn't hurt to email her and see if she just happened to have more than what was up for sale.
Lucky me! She measured what was on her bolt and had more than enough for my borders--yay!
Lucky me again--it was on SALE--music to my ears!

Clamshell quilting using taupe Glide thread.
This quilt has been quite an adventure but a lot of fun!
I started with a fat quarter bundle that I had won from Andover Fabrics, did a little retail shopping therapy to fill in, mixed them up with a great block of the month sew-along from Barbara Brackman and ended up with a pretty quilt!!

Dixie Diary gets her label tonight!!

Saturday, February 22, 2014

Cabin Fever??

Over at Lilypad Quilting, it was asked what we do when Cabin Fever sets in and you are feeling a little crazed. 
Aurifil thread box
It was suggested that you could use your empty Aurifil box to make a nifty tent.
Hmmm...I'm not so sure about that.... 

But I happen to know that my empty Aurifil spools make a pretty awesome vehicle!  
Making blocks for a good cause helps cure the fever--these are for our guild and will go into a Habitat for Humanity quilt eventually. I managed to squeak out 4 blocks from my little kit that was handed out at this month's meeting. 

And if you are REALLY feverish, you can go through your quilts and find the ones that still need labels.
Glad I can check that off my to-do list!
Head over to the Lilypad for more cures!

Friday, February 21, 2014

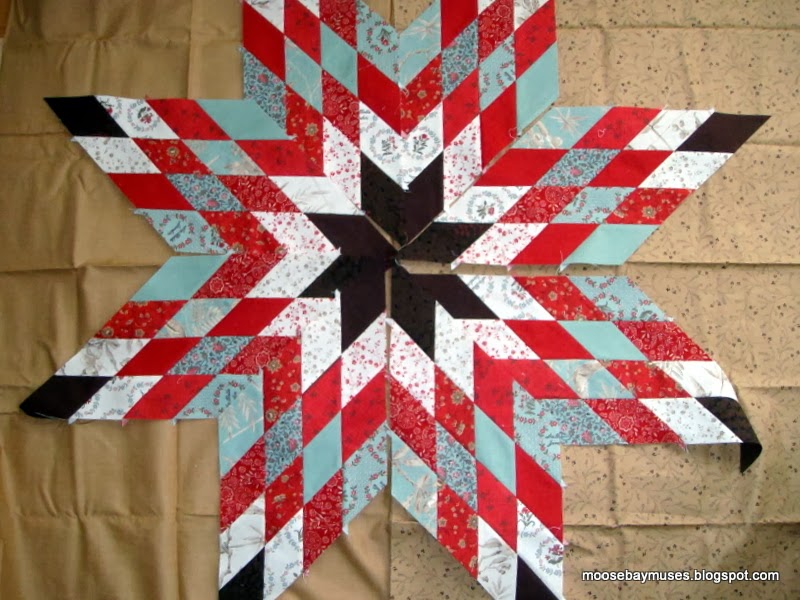
Center Stage! My February Schnibble...

I haven't participated in the last few Another Year of Schnibbles. I have had so many things I needed to finish, I couldn't justify taking the time to start a new project.
 But, when it was announced that for this month we could choose any Schnibbles pattern we liked, I was ecstatic!
 I have been wanting to make Center Stage for ages!
Schnibbles Center Stage
I've never made a Lone Star,
so I thought this would be a good start before tackling something bigger.  

My first challenge: no multiple charm packs on hand.
 Then I noticed this Dessert Roll sitting on my cutting table looking so pretty!
Dessert Rolls are 5" wide, so I could cut my own charms and have several of the same color and print.
 

Why is it so hard to untie those bows and start using the fabric??

There are only 20 fabrics from a line in a dessert roll.
 Since they're 5" wide and the width of the fabric, you can do a lot of things with them.
I think they are my new best friends!

After reading the pattern carefully, I realized I didn't have to cut charms, just the rectangles needed for the Lone Star. There was a lot less wasted fabric since I didn't have a left over piece from a 5" square

The rectangles get sewn together in pairs and then trimmed into the angled pieces.
The pattern was so well written I didn't feel nervous about making my first ever Lone Star.
It was pretty fun seeing it come together. 

I tested a couple of different backgrounds.
 I had a lot of this fabric, but was afraid it was a little too light. 

Both of these backgrounds are from the French General line Maison de Garance.
I had these in my stash, and really wanted to use the print on the right, but was an eighth of a yard short to be able to cut the squares needed to make the setting triangles. It finally dawned on me that I could cut the triangles separately from a strip instead of a square. Yay! No fabric shopping necessary! 

lone star
Her she is all quilted and bound.
 I was a little nervous about the set in seams and even considered splitting the corner squares to avoid them, but I took a deep breath and went for it. Thankfully it all went together beautifully. 

center stage
Difficult to see the feather quilting that winds around the star.
The star is just continuous curves.

The back is pretty too--an old Blackbird Designs fabric from Anna's Starry Night line. 
 Thanks to Sinta at the Pink Pincushion and Sherri at A Quilting Life for hosting Another Year of Schnibbles! Be sure to check out their blogs at the beginning of next month for the Parade of Schnibbles. It will be fun to see what everyone comes up with!

Saturday, February 15, 2014

News Flash!!

Heather was the winner of the Grow Your Blog drawing.
Thanks to everyone for your sweet comments!

Operation press and de-paper has been completed! 

Pressed open (to the dark!).

Paper Removal Complete.
Now back to our regular programming:

Test blocks have been sewn, fabric has been cut--my next project is waiting patiently!

Thursday, February 13, 2014

Be My Valentine?

My funny valentine.  

It's no secret anymore, Valentine--I almost never dust! Yikes!

My wooly garland adorning the spinning wheel.

Happy Valentine's Day--hope it's everything you hope it to be!!

Triangle Fever

Don't forget to comment on my Grow Your Blog drawing HERE--ends on Saturday!!

I've been up to my elbows (well, maybe just my wrists) in half square triangles. I need LOTS of them. Originally I had planned to use the Magic 8 method to make the triangles I need for Simply Red, but at the last minute I switched gears--just couldn't face squaring up 388 HST's!
I love my Triangulations CD--best investment ever!!

Next step: snipping off those corners!

Yeah--it's gonna get messy.....
seems every third corner jumps out of the basket.

I highly recommend the spring action clippers to save your hands.
Next Step: pressing open and removing the paper...ack!
Good thing I have Downton Abbey waiting on the DVR!

This week's Quilty Fun block--Falling Leaves.